Controllers in Project 64 Emulator

Project 64, the beloved Nintendo 64 emulator, allows gamers to relive the magic of classic N64 titles on their computers. To fully enjoy the gaming experience, it's crucial to have the right controller setup. In this article, we'll delve into the world of controllers in Project 64, covering everything from connecting various controllers to troubleshooting common issues. Whether you prefer a keyboard and mouse, console controllers, or even retro USB options, we have you covered.
In this guide, we will walk you through the process of setting up controllers and joysticks with Project 64. You'll learn how to connect popular controllers such as Xbox One or Xbox 360, PlayStation 3, PlayStation 4, PlayStation 5, Nintendo Switch, GameCube, and even older Nintendo 64 controllers. We'll also cover the setup for retro USB controllers, as well as keyboard and mouse configurations.
Once your controller or joystick is connected, we'll guide you through the configuration process, including button mapping, analog stick sensitivity adjustments, and the creation of controller profiles. With these steps, you'll be able to tailor your control scheme to your liking, providing you with a comfortable and seamless gaming experience.
Additionally, we'll address common troubleshooting issues that you may encounter during the setup process, such as controller detection problems, analog stick issues, and unresponsive keyboard controls. By following our troubleshooting tips, you'll be able to overcome these obstacles and get back to enjoying your favorite N64 games on Project 64.
How To Setup Keyboard and Mouse on Project 64?
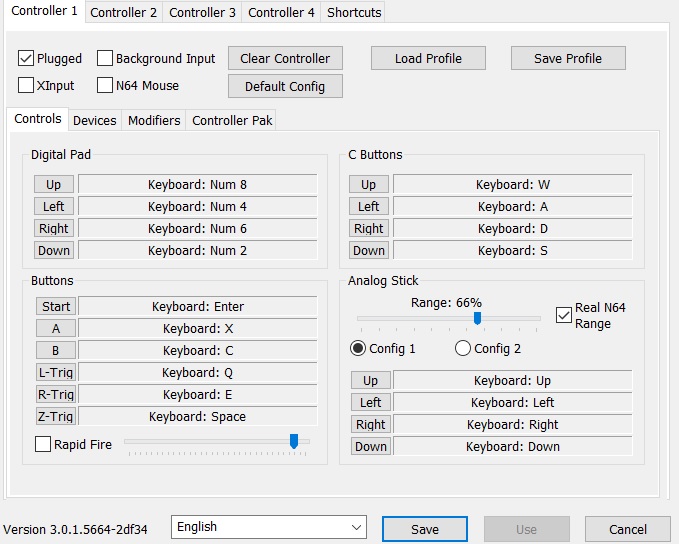
For those who prefer the precision of a keyboard and mouse setup, configuring them in Project 64 is a straightforward process. By accessing the emulator's input settings, you can map keyboard keys to specific N64 buttons and customize mouse controls to replicate the analog stick movement. This allows for seamless control and an enhanced gaming experience.
To set up a keyboard and mouse on Project 64 using the N-Rage plugin, follow these steps:
- First, by getting this far in this tutorial we assume that you have followed our Project 64 setup guide and you have a proper Project 64 installation.
- Download and latest version of N-Rage Plugin. Extract the contents of the downloaded file to a convenient location on your computer.
- Open the Plugin Folder: Navigate to the Project 64 installation directory on your computer. This is typically located in "C:\Program Files\Project64" or "C:\Program Files (x86)\Project64".
- Copy the N-Rage Plugin: Open the extracted N-Rage plugin folder and locate the file named "NRage_Input_V2.dll". Copy this file.
- Paste the Plugin into Project 64: Go back to the Project 64 installation directory and open the "Plugin" folder. Paste the copied "NRage_Input_V2.dll" file into this folder.
- Launch Project 64: Run Project 64 on your computer.
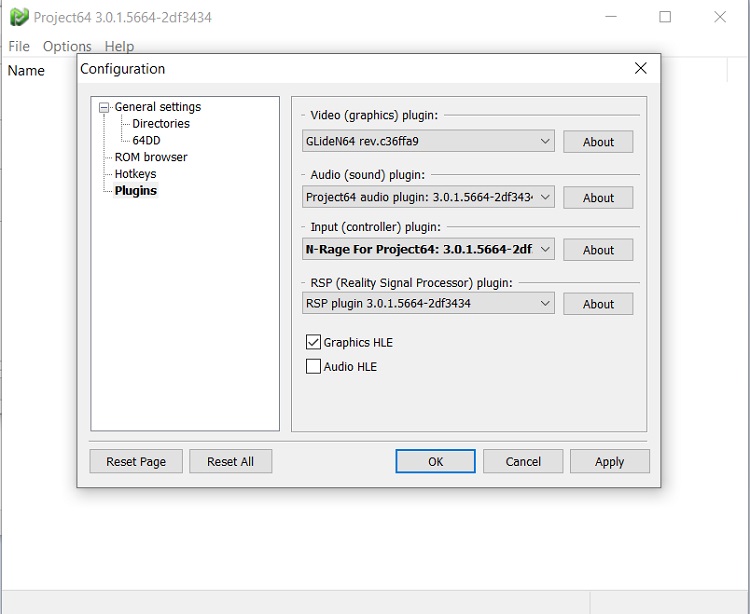
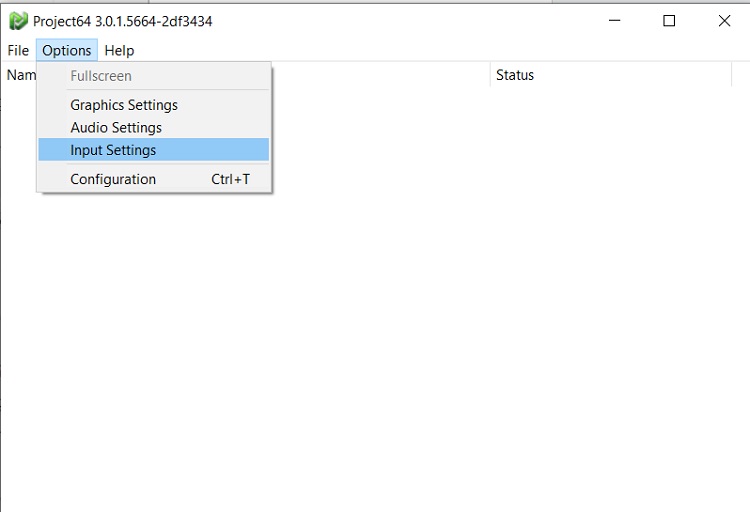
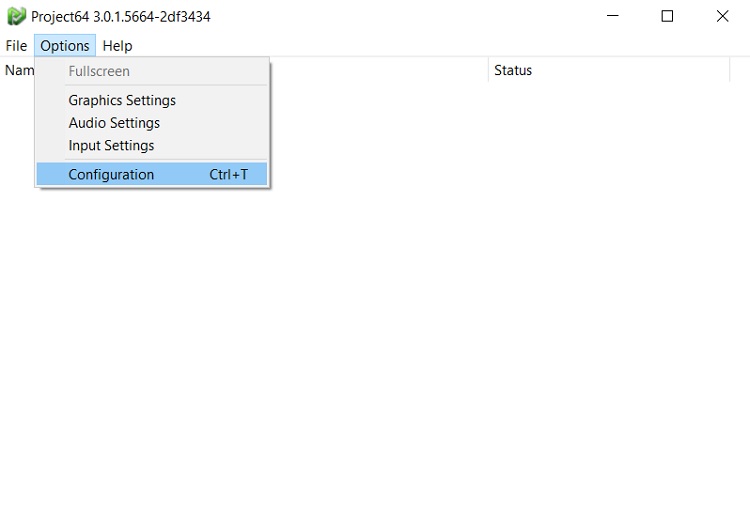
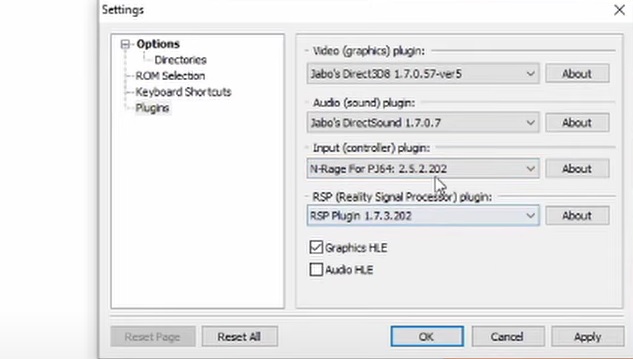
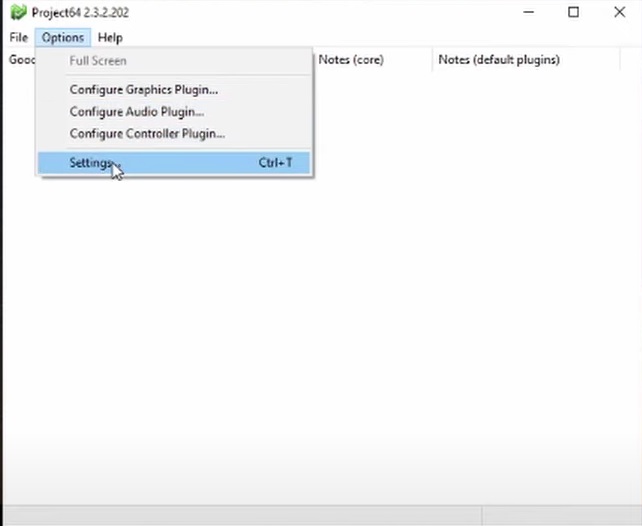
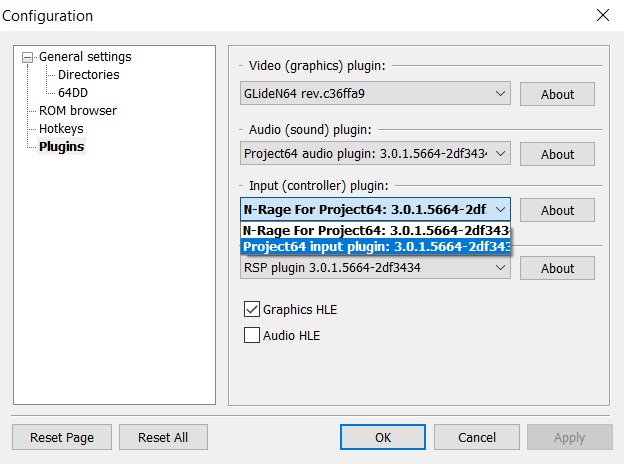
- Access the Controller Plugin Settings: In Project 64, click on "Options" in the menu bar and select "Settings" from the dropdown menu. In the settings window, click on the "Plugins" tab.
- Select the N-Rage Plugin: Under the "Input (controller) plugin" section, click on the dropdown menu and select "N-Rage's Direct-Input V2 2.5d" as the input plugin.
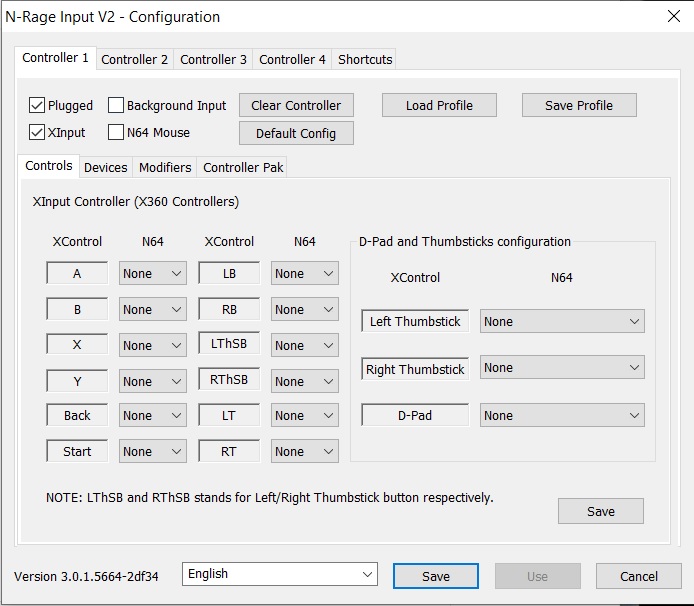
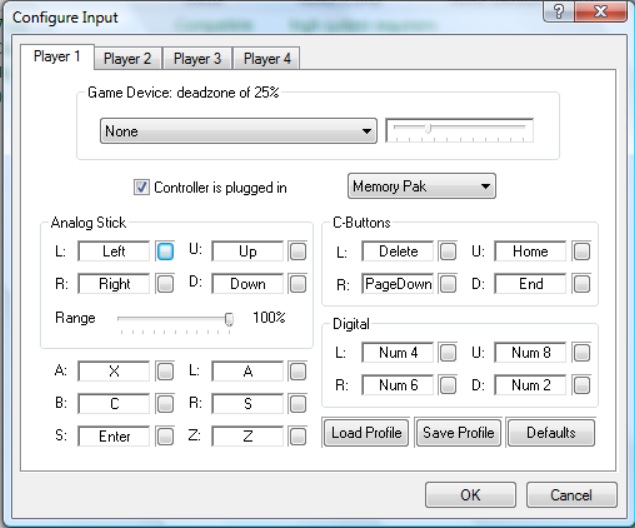
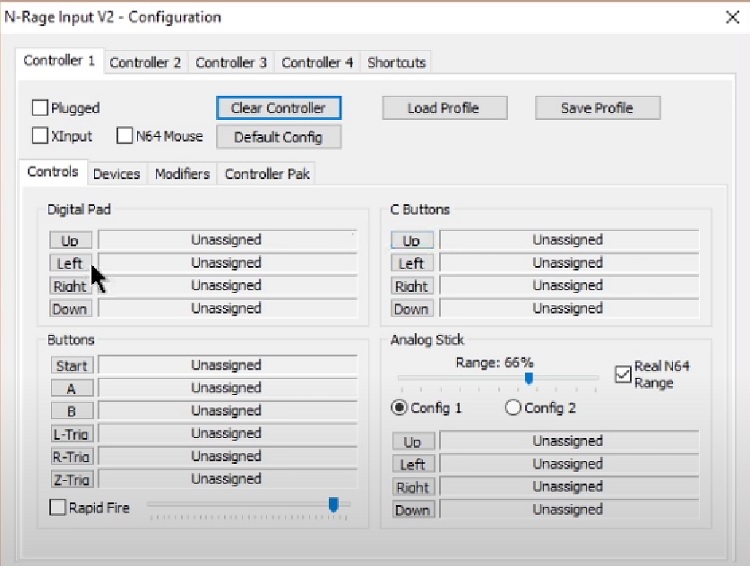
- Configure Keyboard and Mouse Inputs: Click on the "Configure" button next to the input plugin selection. This will open the N-Rage plugin configuration window.
- Configure Keyboard: In the N-Rage configuration window, click on the "Options" tab. Here, you can assign specific keyboard keys to the N64 controller buttons. Click on each N64 button and press the corresponding key on your keyboard to assign it.
- Configure Mouse: In the N-Rage configuration window, click on the "Mouse" tab. Here, you can assign mouse movements and buttons to the N64 controller's analog stick and buttons. Customize the mouse settings according to your preference.
- Save Configuration: After assigning the keyboard and mouse inputs, click on the "OK" button to save the configuration.
- Test Inputs: Launch a game in Project 64 and test the keyboard and mouse inputs. Ensure that the assigned keys and mouse movements are working correctly within the game.
By following these steps, you should be able to set up and configure a keyboard and mouse for use with Project 64 using the N-Rage plugin. Enjoy playing your favorite N64 games with the comfort and precision of a keyboard and mouse setup.
Project 64 Controller/Joystick Setup
Whether you're looking to relive the golden era of Nintendo 64 gaming or explore classic titles for the first time, this guide will assist you in setting up and configuring your controller or joystick with Project 64, allowing you to fully immerse yourself in the world of retro gaming. Let's get started!
Connecting Controller or Joystick on Project 64
To connect a controller or joystick to Project 64, you need to ensure it's compatible with your computer. Most modern controllers can be connected via USB or wireless connections. In this section, we'll provide step-by-step instructions for connecting various controllers to Project 64.
How To Connect Xbox One or Xbox 360 Controller to Project 64?
Using an Xbox One or Xbox 360 controller with Project 64 is a popular choice among gamers. We'll guide you through the process of connecting these controllers to the emulator and configuring them for seamless gameplay.
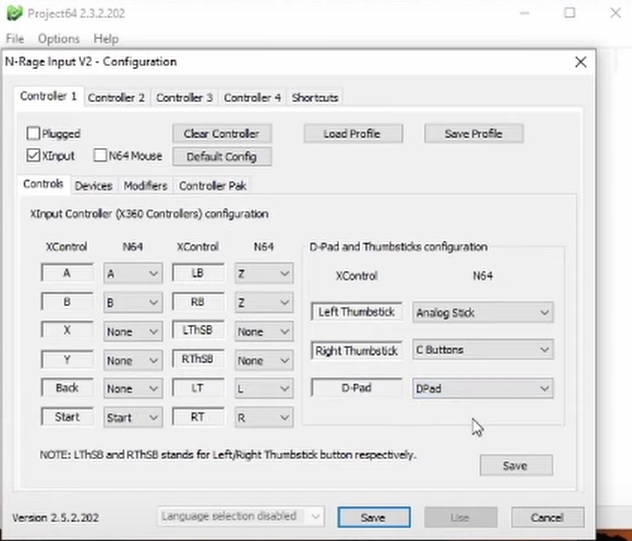
To connect an Xbox One or Xbox 360 controller to Project 64 using the N-Rage plugin, you can follow these steps:
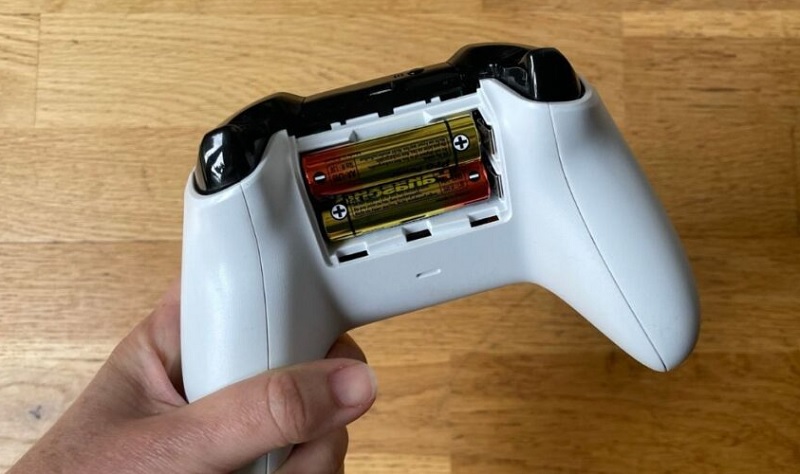
- Make sure your Xbox One or Xbox 360 controller is charged or has fresh batteries.
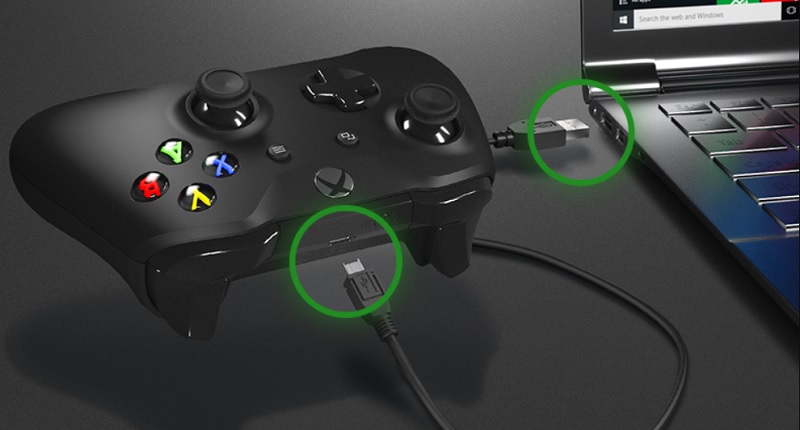
- Connect the controller to your computer using a USB cable. For Xbox One controllers, you can use a micro-USB cable, while Xbox 360 controllers use a standard USB cable.
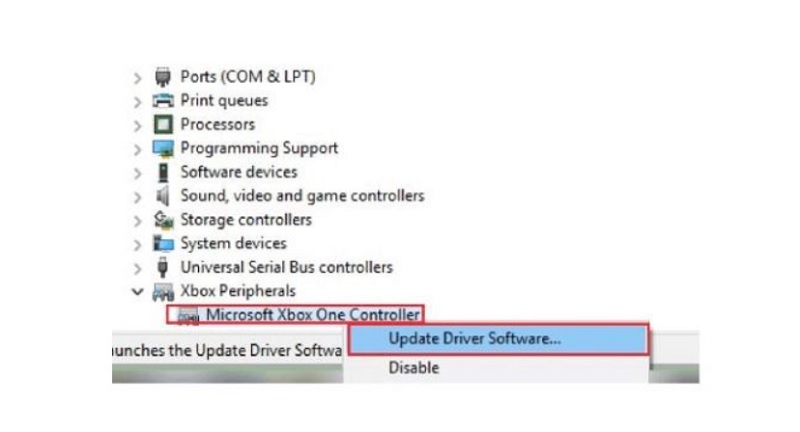
- Ensure that your computer has the necessary drivers installed for the Xbox controller. If not, you can download and install the Xbox controller drivers from the official Microsoft website.
- Launch Project 64 and open the game you want to play.

- Click on "Options" in the menu bar and select "Configure Controller Plugin."

- In the configuration window, click on the "Device" drop-down menu and choose "N-Rage Direct-Input8 V2 2.3c" or a similar option that supports Xbox controllers.
- Click on the "Options" button next to the "Device" drop-down menu.
- In the N-Rage plugin settings window, click on the "Controller" tab.
- Check the box that says "Plugged" to enable the controller input.
- You can also customize the button mappings and sensitivity settings in the respective tabs of the N-Rage plugin settings window.
 Once you have configured the settings to your preference, click "OK" to save the changes.
- Start playing the game using your Xbox One or Xbox 360 controller with the N-Rage plugin in Project 64.
- By using the N-Rage plugin, you can have more advanced control customization options for your Xbox One or Xbox 360 controller in Project 64.
Note: If your Xbox One or Xbox 360 controller doesn't work immediately after connecting, you may need to download and install the Xbox controller drivers for your operating system. You can find these drivers on the official Microsoft website. Once the drivers are installed, follow the steps mentioned above to connect and configure your controller in Project 64.
How To Use PS3 Controller on P64?
To use a PS3 controller on Project 64, you will need to follow these steps:
- Connect your PS3 Controller to your PC: To connect the PS3 controller to your computer, you'll need to use a USB cable. Plug one end of the USB cable into the controller and the other end into an available USB port on your computer.
- Install SCP Toolkit: SCP Toolkit is a software package that allows your computer to recognize and work with the PS3 controller. Run the installer and follow the on-screen instructions to install the software on your computer. If you are facing any problems, see the documentation at the Github SCP Toolkit page.
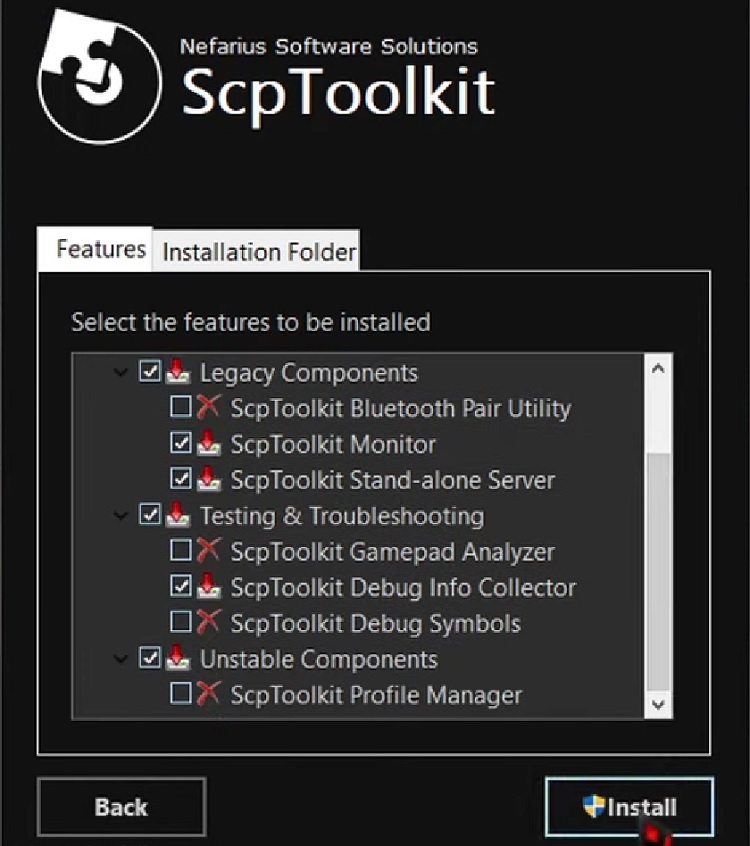
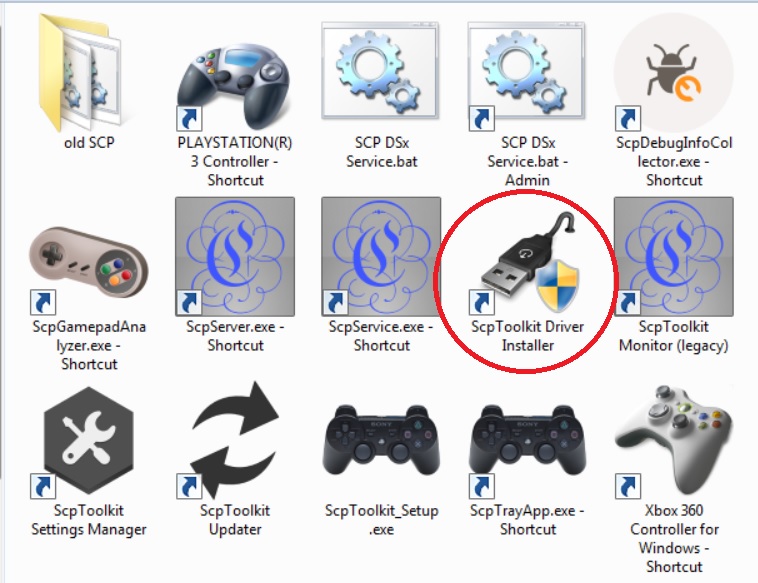
- Run the SCP Toolkit Configuration: After installing SCP Toolkit, you should find a program called "ScpToolkit Driver Installer" on your desktop or in your Start menu. Run this program to open the SCP Toolkit configuration.
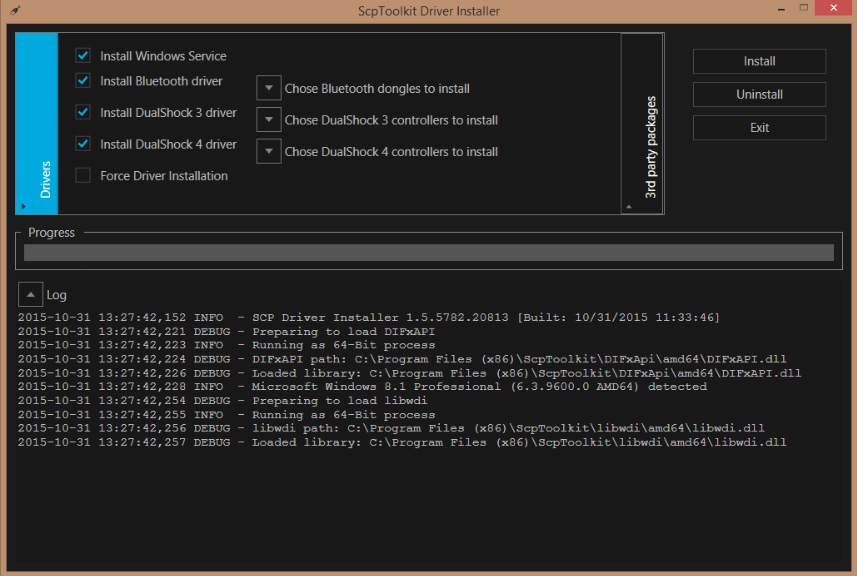
- Configure the PS3 Controller: In the SCP Toolkit configuration, you should see a list of connected controllers. If your PS3 controller is properly connected, it should appear on this list. Check the box next to the controller's entry and click on the "Install" button. This will install the necessary drivers for your PS3 controller.
- Run Project 64: Once the installation process is complete, launch Project 64 on your computer.

- Configure Controller Settings: In Project 64, click on "Options" in the menu bar and select "Settings" from the dropdown menu. In the settings window, click on the "Plugins" tab.
- Select the N-Rage Plugin: Under the "Input (controller) plugin" section, click on the dropdown menu and select "N-Rage's Direct-Input8 V2 2.5c" as the input plugin.
- Configure the PS3 Controller in N-Rage: Click on the "Configure" button next to the input plugin selection. In the N-Rage plugin configuration window, click on the "Options" tab.
- Enable DInput: In the N-Rage configuration window, check the box next to "Use DInput" to enable DirectInput mode.
- Map the PS3 Controller Buttons: Click on each N64 button in the N-Rage configuration window and press the corresponding button on your PS3 controller. You may need to use the D-pad or analog sticks on the PS3 controller to navigate through the button mappings.
- Save Configuration: After assigning the PS3 controller buttons, click on the "OK" button to save the configuration.
- Test the PS3 Controller: Launch a game in Project 64 and test the PS3 controller inputs. Ensure that the assigned buttons and analog sticks are working correctly within the game.
By following these steps, you should be able to use a PS3 controller with Project 64 and enjoy playing your favorite N64 games with the familiar PS3 controller layout.
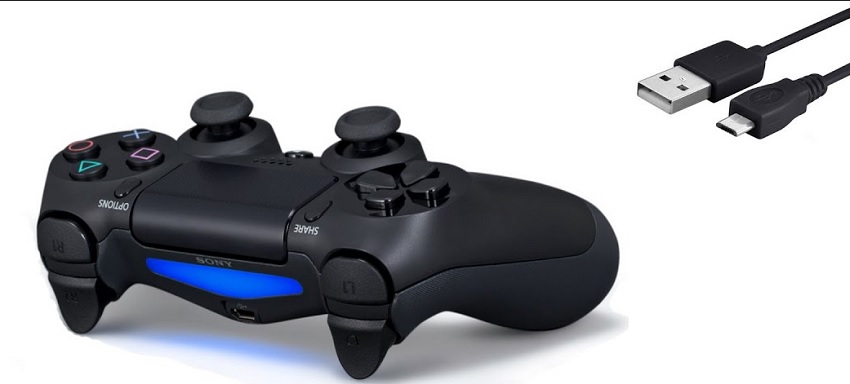
How To Use PS4 and PS5 Dualshock Controller on P64?
If you're a fan of PlayStation controllers, you'll be pleased to know that you can use your DualShock 4 and 5 controller with Project 64. We'll explain the necessary steps to connect these controllers and optimize their functionality.
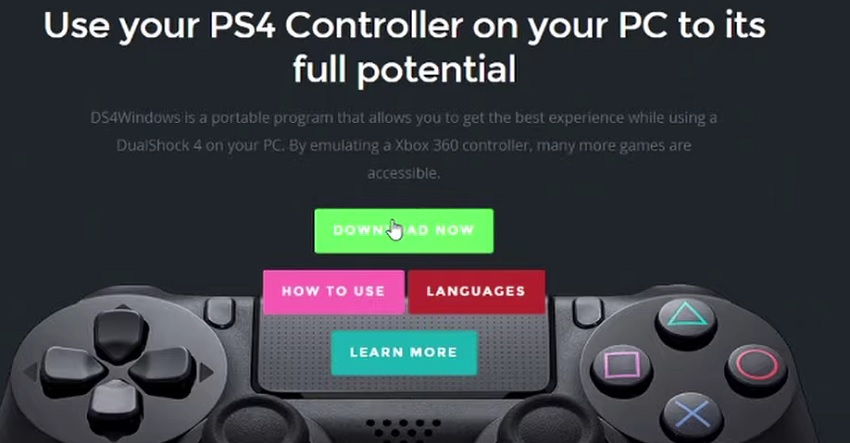
To use a PS4 controller on Project 64 with DS4Windows, follow these steps:
- Download the latest version of DS4Windows, either DS4Windows x64 or DS4Windows x86 depending on your OS version.
- Install DS4Windows: Run the DS4Windows program installer that you downloaded. Follow the on-screen instructions to install DS4Windows on your computer. You may be prompted to install additional drivers during the setup process.
- Connect your PS4 Controller to your PC: To connect the PS4 controller to your computer, you'll need to use a USB cable. Plug one end of the USB cable into the controller and the other end into an available USB port on your computer.
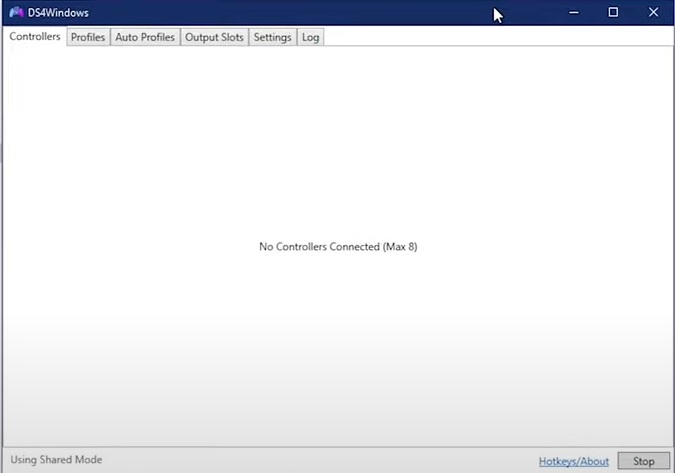
- Run DS4Windows: After the installation is complete, launch the DS4Windows program. You may be prompted to extract and run the DS4Updater program. Follow the prompts to complete the setup.
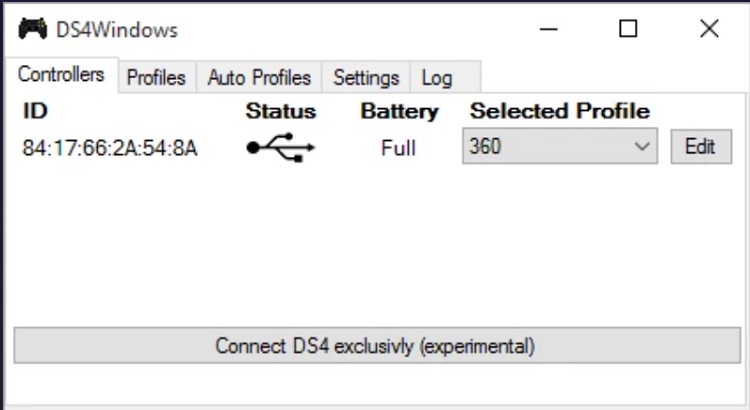
- Configure DS4Windows: Once DS4Windows is running, you should see the main DS4Windows interface. The PS4 controller should be detected and displayed in the program. If it's not detected, click on the "Controllers" tab and then the "Connect DS4 exclusively" option.
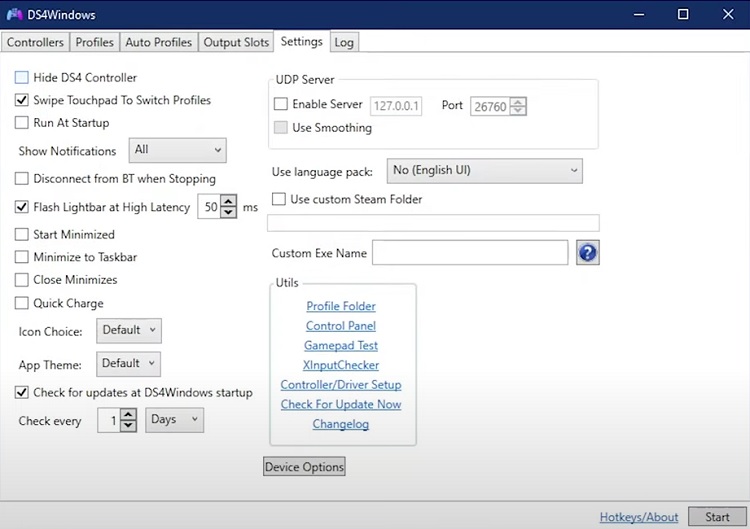
- Map the PS4 Controller Buttons: In DS4Windows, click on the "Settings" tab. Here, you can customize the button mappings for the PS4 controller. You can also adjust the sensitivity and other settings according to your preference.
- Start Project 64: Launch Project 64 on your computer.

- Configure Controller Settings: In Project 64, click on "Options" in the menu bar and select "Settings" from the dropdown menu. In the settings window, click on the "Plugins" tab.
- Select the N-Rage Plugin: Under the "Input (controller) plugin" section, click on the dropdown menu and select "N-Rage's Direct-Input8 V2 2.5c" as the input plugin
 .
. - Configure the PS4 Controller in N-Rage: Click on the "Configure" button next to the input plugin selection. In the N-Rage plugin configuration window, click on the "Options" tab.
- Enable DInput: In the N-Rage configuration window, check the box next to "Use DInput" to enable DirectInput mode.
- Map the PS4 Controller Buttons: Click on each N64 button in the N-Rage configuration window and press the corresponding button on your PS4 controller. Use the DS4Windows program to identify which button corresponds to each N64 button.
- Save Configuration: After assigning the PS4 controller buttons, click on the "OK" button to save the configuration.
- Test the PS4 Controller: Launch a game in Project 64 and test the PS4 controller inputs. Ensure that the assigned buttons and analog sticks are working correctly within the game.
By following these steps, you should be able to use a PS4 controller with Project 64 using DS4Windows and enjoy playing your favorite N64 games with the familiar PS4 controller layout.
How To Use Steam Controller with Project 64 Emulator?
Steam Controller, known for its unique touchpads and customization options, can also be used with Project 64. We'll walk you through the process of setting up the Steam Controller and mapping its inputs for a personalized gaming experience.
To use a Steam Controller with Project 64 emulator using XInput, you can follow these steps:
- Ensure that your Steam Controller is connected and paired with your computer via Bluetooth or the wireless USB adapter.
- Launch the Steam client on your computer.
- In the Steam client, click on the "Steam" menu in the top left corner and select "Settings."
- In the Settings window, navigate to the "Controller" tab.
- Within the Controller settings, click on "General Controller Settings."
- Make sure the "Generic Gamepad Configuration Support" option is enabled.
- Close the Steam Settings window.
Now, to configure the Steam Controller for Project 64:
- Launch Project 64 and open the game you want to play.
- Click on "Options" in the menu bar and select "Configure Controller Plugin."
- In the configuration window, click on the "Device" drop-down menu and choose the XInput plugin.
- Connect the Steam Controller to your computer if it isn't already connected.
- The Steam Controller should now be recognized as an XInput device by Project 64.
- Configure the buttons and analog stick movements for your Steam Controller using the XInput plugin's settings.
- If necessary, you can also adjust sensitivity settings and dead zones in the XInput plugin settings.
- Click "OK" to save the configuration.
Now you should be able to use your Steam Controller to play games on Project 64. The Steam Controller will be recognized as an XInput controller, providing compatibility and allowing you to enjoy your favorite Nintendo 64 games with the Steam Controller's unique features and customization options.
How To Connect GameCube Controller to Project 64?
GameCube enthusiasts can connect their controllers to Project 64 to relive their favorite games. To connect a GameCube controller, you'll need a USB adapter that converts the GameCube controller's input into a format recognized by your PC. Once connected, you can configure the button mappings and sensitivity settings within Project 64 to ensure a seamless gaming experience.
Here's a step-by-step guide on how to connect a GameCube controller to Project 64 using Zadig:
- Download and Install the latest version of Zadig. It requires Windows 7 or later (XP and Vista are not supported) . Once downloaded, run the installer and follow the on-screen instructions to install Zadig on your computer.

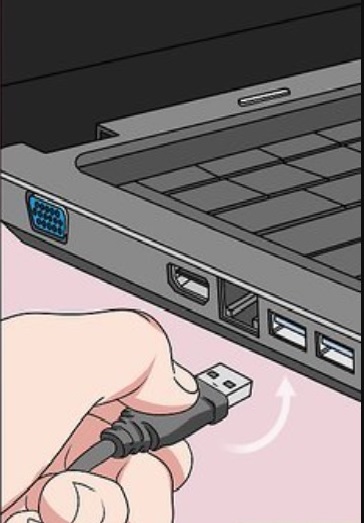
- Connect the GameCube Controller: Plug your GameCube controller into an available USB port on your computer using a compatible USB adapter. Ensure that the controller is securely connected.
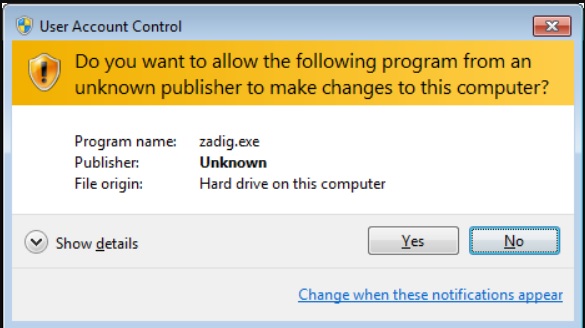
- Open Zadig: Launch the Zadig application that you installed in the previous step. You may need to run it as an administrator depending on your system settings.
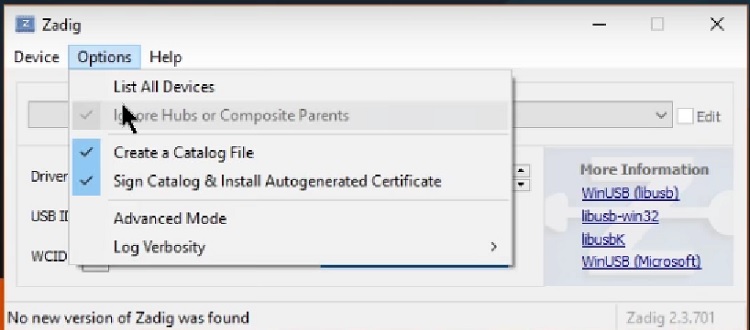
- Select the GameCube Controller: In Zadig, click on the "Options" menu and enable the "List All Devices" option. This will display all the connected USB devices in the dropdown menu.
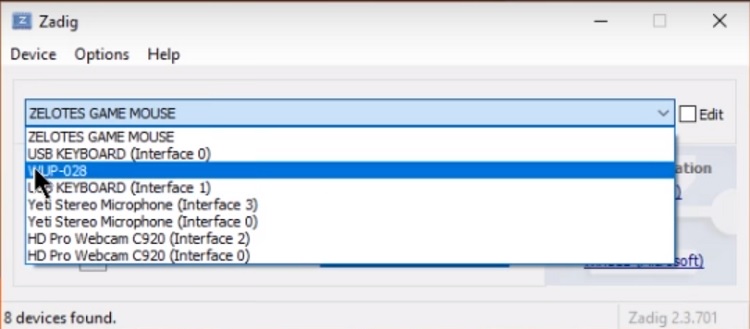
- Choose the GameCube Controller: From the dropdown menu, select the GameCube controller. It should be listed as "WUP-028" or something similar.
- Install the Driver: Once you have selected the GameCube controller, choose the appropriate driver from the driver dropdown menu. Select "WinUSB" or "libusb-win32" as the driver. Make sure to double-check the selected driver before proceeding.
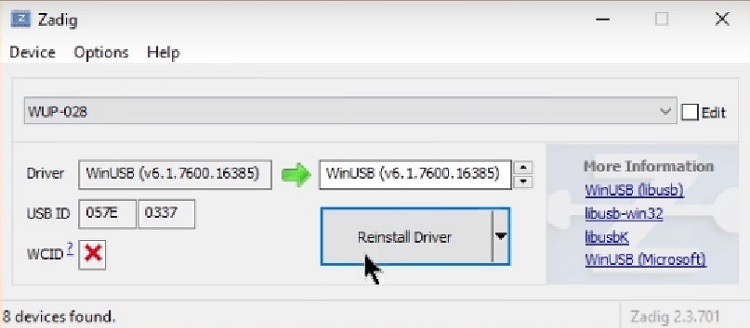
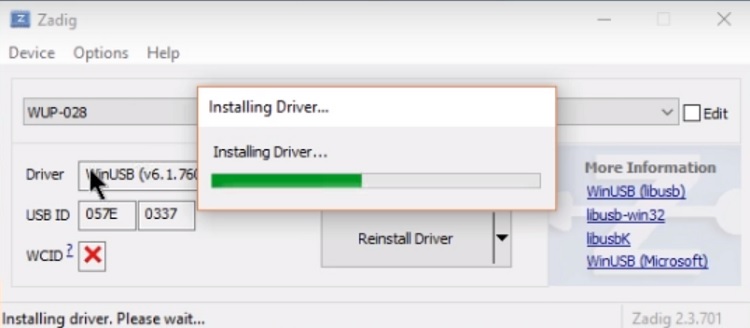
- Install the Driver with Zadig: Click on the "Install Driver" or "Replace Driver" button to install the selected driver for the GameCube controller. Zadig will replace the existing driver with the chosen one.
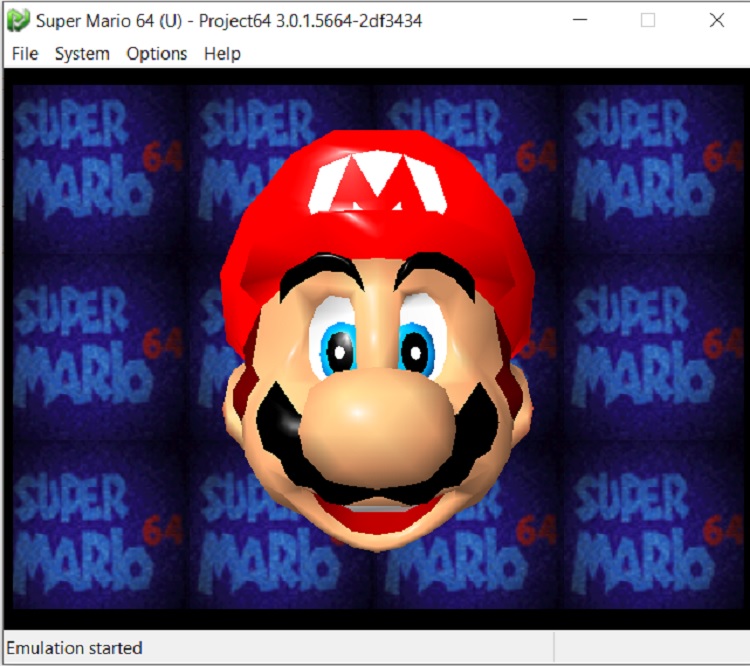
- Open Project 64: Launch the Project 64 emulator on your computer.
- Configure Controller Settings: Within Project 64, access the input or controller settings. This can usually be found in the settings or options menu.
- Map the GameCube Controller Buttons: In the controller settings, map the buttons on the GameCube controller to their corresponding N64 buttons. Follow the on-screen instructions or refer to the documentation provided with the emulator.
- Test the Controller: Once the button mappings are set, test the GameCube controller to ensure it is functioning correctly within Project 64. You can do this by launching a game and attempting to control the character or navigate through menus using the GameCube controller.
By following these steps, you should be able to connect your GameCube controller to Project 64 using Zadig and enjoy playing your favorite N64 games with the GameCube controller.
How To Connect Switch Controller to Project 64?
Nintendo Switch controllers, such as the Joy-Cons or the Pro Controller, can also be used with Project 64. We'll explain how to connect these controllers and customize their inputs to suit your preferences.
To connect a Switch controller to Project 64 we will be using the Steam client, so you will need a proper Steam installation and an account before getting started with this guide!
There are alternative ways to connect Nintendo Switch to P64, but the Steam client makes the process straightforward and easy. You can follow these steps:
- Ensure that your Switch controller is paired with your computer via Bluetooth or USB.
- Make sure you have the Steam client installed on your computer and that it recognizes your Switch controller.
- Launch the Steam client.
- In the Steam client, click on the "Steam" menu in the top left corner and select "Settings."
- In the Settings window, navigate to the "Controller" tab.
- Within the Controller settings, click on "General Controller Settings."
- Make sure the "Switch Pro Configuration Support" option is enabled.
- Close the Steam Settings window.
Now, to configure the Switch controller for Project 64:
- Launch Project 64 and open the game you want to play.
- Click on "Options" in the menu bar and select "Configure Controller Plugin."
- In the configuration window, click on the "Device" drop-down menu and choose the Steam plugin.
- Connect the Switch controller to your computer if it isn't already connected.
- The Switch controller should now be recognized as a Steam controller by Project 64 through the Steam plugin.
- Configure the buttons and analog stick movements for your Switch controller using the Steam plugin's settings.
- If necessary, you can also adjust sensitivity settings and dead zones in the Steam plugin settings.
- Click "OK" to save the configuration.
With these steps, your Switch controller should be connected and configured to work with Project 64 using the Steam plugin. You can now enjoy playing your favorite Nintendo 64 games with the Switch controller's functionality and customization options.
How To Connect Old Nintendo 64 Controller on PC?
To connect an old Nintendo 64 controller to your PC, you will need a USB adapter specifically designed for Nintendo 64 controllers. These adapters convert the controller's signals to a format that your PC can recognize. Here's a step-by-step guide on how to connect an old Nintendo 64 controller to your PC:
- Purchase a USB adapter for Nintendo 64 controllers. You can find these adapters online or at gaming specialty stores. Make sure to choose an adapter that is compatible with your specific operating system.
- Once you have the USB adapter, connect it to an available USB port on your computer.
- Connect your old Nintendo 64 controller to the adapter. The adapter should have ports or connectors that match the controller's cable.
- Wait for your computer to detect the USB adapter and install any necessary drivers. In most cases, the adapter will be recognized as a standard USB input device.
- Launch Project 64 or your preferred emulator.
- Click on "Options" in the menu bar and select "Configure Controller Plugin."
- In the configuration window, choose the appropriate controller plugin based on the USB adapter you are using. Most adapters will emulate the Nintendo 64 controller as a standard gamepad.
- Configure the buttons and analog stick movements for your Nintendo 64 controller by clicking on the corresponding buttons in the "Device" section of the configuration window.
- Once you have mapped the buttons and analog stick movements to your preference, click "OK" to save the configuration.
Now, your old Nintendo 64 controller should be connected and ready to use with Project 64 on your PC. You can start playing games using the nostalgic feel of the original Nintendo 64 controller. Enjoy your gaming experience!
Multiple (Two or More) Controllers with Project64
Using two controllers with Project 64 allows you to enjoy multiplayer games and experience the classic Nintendo 64 gaming experience with friends or family. To set up two controllers with Project 64, follow these steps:
- Connect the first controller:
- Connect the first controller (e.g., Xbox, PlayStation, Nintendo Switch) to your computer using a USB cable or wireless connection as per the respective controller's instructions.
- Make sure the controller is recognized by your computer and functioning correctly. Install any necessary drivers if prompted.
- Configure the first controller in Project 64:
- Launch Project 64 and open the game you want to play.
- Click on "Options" in the menu bar and select "Configure Controller Plugin."
- In the configuration window, select the appropriate controller plugin (e.g., N-Rage, XInput) that matches your first controller.
- Configure the buttons and analog stick movements for the first controller by clicking on the corresponding buttons in the "Device" section.
- Save the controller configuration and close the configuration window.
- Connect the second controller:
- Connect the second controller (e.g., another Xbox, PlayStation, Nintendo Switch controller) to your computer using a separate USB cable or wireless connection.
- Ensure the second controller is recognized by your computer and functioning correctly. Install any necessary drivers if required.
- Configure the second controller in Project 64:
- With Project 64 still running, go to the game's input settings or controller configuration within the emulator.
- Assign the buttons and analog stick movements for the second controller by following the same steps as you did for the first controller.
- Save the controller configuration for the second controller.
- Start playing multiplayer games:
- Once both controllers are connected and configured, you can start playing multiplayer games in Project 64.
- Select the appropriate game mode or multiplayer option within the game you are playing.
- Each controller should now control a separate player or character within the game.
By following these steps, you can enjoy multiplayer gaming sessions with two controllers in Project 64, reliving the joy of classic Nintendo 64 multiplayer titles with friends or family.
Controller Configuration and Mapping on Project 64
One crucial aspect of Project64 is configuring and mapping your controller to ensure a smooth and enjoyable gaming experience. Here, we will guide you through the process of setting up and mapping your controller in Project 64.
To configure and map your controller in Project 64, you can follow these steps:
- Launch Project 64: Open the Project 64 emulator on your computer.
- Access the Settings: Click on the "Options" menu at the top of the emulator window and select "Settings."
- Controller Plugin: In the Settings window, click on the "Plugins" tab.
- Configure Controller Plugin: Locate and click on the "Controller Plugin" section within the Plugins tab.
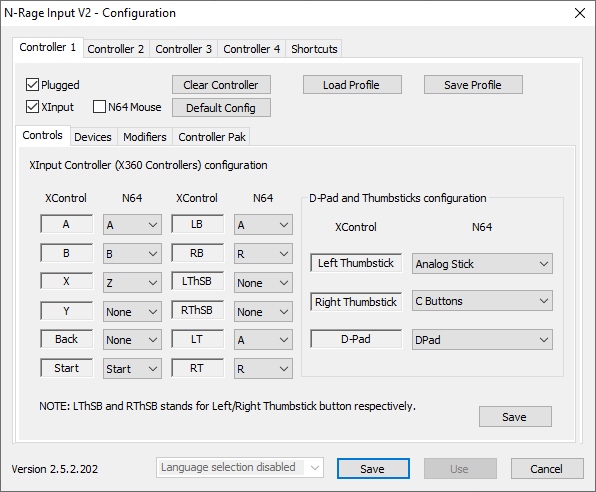
- Select Your Controller: From the drop-down menu, choose the controller plugin that matches your controller. Some common controller plugins include N-Rage, XInput and Jabo's DirectInput7.
- Configure the Controller: Once you've selected the appropriate controller plugin, click on the "Configure" button next to it.
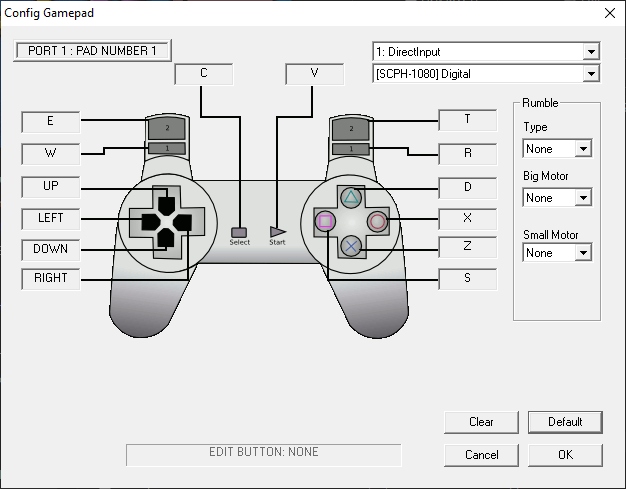
- Controller Configuration Window: A new window will appear where you can configure your controller.
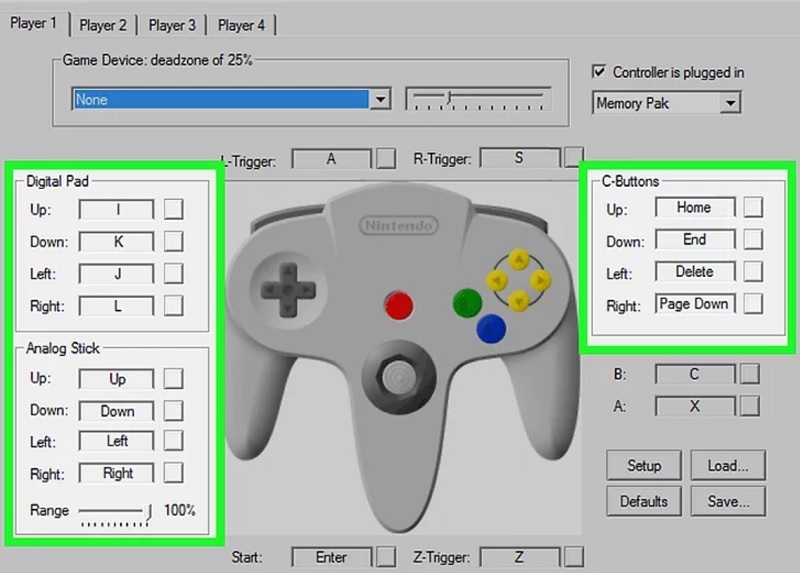
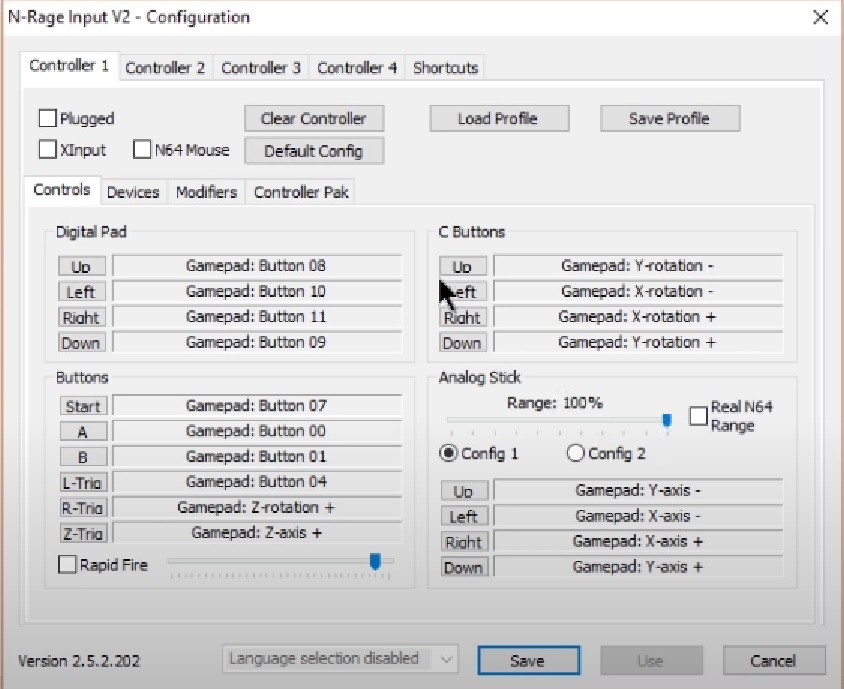
- Mapping Buttons: In the controller configuration window, you'll see a diagram of a Nintendo 64 controller. To map each button, click on the corresponding area on the diagram and press the corresponding button on your physical controller. Repeat this process for all the buttons, including the directional pad (D-pad) and analog stick.
- Analog Stick Dead Zone: Adjust the "Dead Zone" slider for the analog stick. The dead zone is the amount of movement required before the emulator registers input. Move the slider until the analog stick feels comfortable for you. Be cautious, this will modify your controller sensitivity.
- Save Configuration: After mapping all the buttons and adjusting the analog stick dead zone, click the "OK" or "Save" button to save your controller configuration.
- Test Your Controller: To ensure your controller is working correctly, you can click on the "Test" button in the controller configuration window. It will bring up a testing interface where you can see if your inputs are being registered accurately.
- Close the Settings Window: Once you're satisfied with the controller configuration, close the Settings window.
- Start a Game: Open a Nintendo 64 ROM file within Project 64 and start playing the game using your configured controller.
Project 64 Controller(Input) Plugins
Project 64, the Nintendo 64 emulator, supports various controller plugins that allow you to configure and use different input devices. Here are some commonly used controller plugins for Project 64:
- N-Rage
- XInput
- Jabo's DirectInput7
- Pokopom
To use these plugins with Project 64, you typically need to download the plugin files and place them in the appropriate directory within the Project 64 installation folder. Afterward, you can select and configure the desired plugin from the "Options" menu within the emulator. Keep in mind that plugin availability and compatibility may vary depending on the specific version of Project 64 you are using.
Controller Troubleshooting with P64 - Common Controller Errors
Just like any other software, P64 can sometimes encounter issues with controller detection and functionality. Below, we will discuss some common problems related to controllers while using Project 64 and provide troubleshooting steps to resolve them.
Controller Not Detectable?
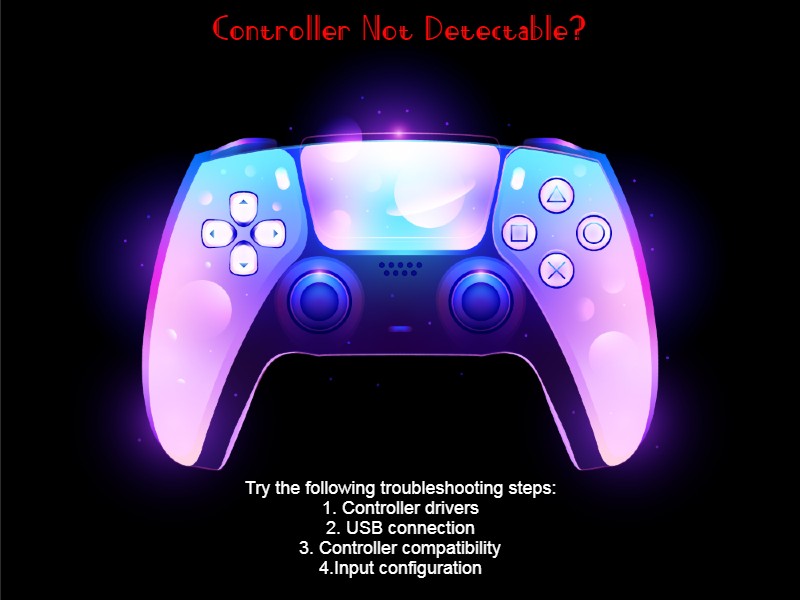
One of the frustrating issues users may encounter is when Project 64 fails to detect their controller. If you're experiencing this problem, try the following troubleshooting steps:
- Controller drivers: Ensure that your controller is properly installed and that you have the necessary drivers. Visit the manufacturer's website and download the latest drivers for your specific controller model. Install the drivers and restart your computer.
- USB connection: Check the USB connection between your controller and computer. Try using a different USB port and cable to rule out any hardware issues. If you're using a wireless controller, make sure it's properly connected and paired with your computer.
- Controller compatibility: Verify that your controller is supported by Project 64. Visit the official Project 64 website or relevant forums to confirm compatibility. Some controllers may require additional configuration or third-party plugins to function correctly.
- Input configuration: Open Project 64 and go to the "Options" menu, then select "Configure Controller Plugin." Ensure that your controller is selected as the input device. Click on each button and follow the on-screen prompts to map them correctly.
Analog Stick Issue
 Analog Stick Issue">
If you're experiencing problems with the analog stick on your controller, follow these troubleshooting steps:
- Calibration: Some controllers allow for calibration to fix any issues with the analog stick. Refer to the controller's manual or manufacturer's website for instructions on how to calibrate it. Once calibrated, restart Project 64 and check if the analog stick works properly.
- Plugin configuration: Open Project 64 and go to the "Options" menu, then select "Configure Controller Plugin." Ensure that the analog stick is correctly mapped. If it's not responding or behaving erratically, try reassigning it or resetting the configuration to default.
- Deadzone settings: Project 64 provides deadzone settings to adjust the sensitivity of analog sticks. Open the controller plugin configuration and look for deadzone options. Increase the deadzone value if the analog stick is too sensitive or decrease it if it's unresponsive.
- Controller has has stick drift - this happens when the controller stick is held in a direction while turning on the console or in our case the emulator. Just restart the emulator without holding the stick to return it to normal state.
Joystick Detected But Not Working
In some cases, Project 64 may detect your controller but fail to register inputs. If you encounter this issue, try the following steps:
- Plugin configuration: Open Project 64 and go to the "Options" menu, then select "Configure Controller Plugin." Ensure that the controller is properly assigned and mapped. Double-check that the buttons and joysticks are correctly configured.
- Controller mode: Some controllers have different modes, such as DirectInput and XInput. Try switching between these modes to see if it resolves the issue. Consult the controller's manual or manufacturer's website for instructions on changing modes.
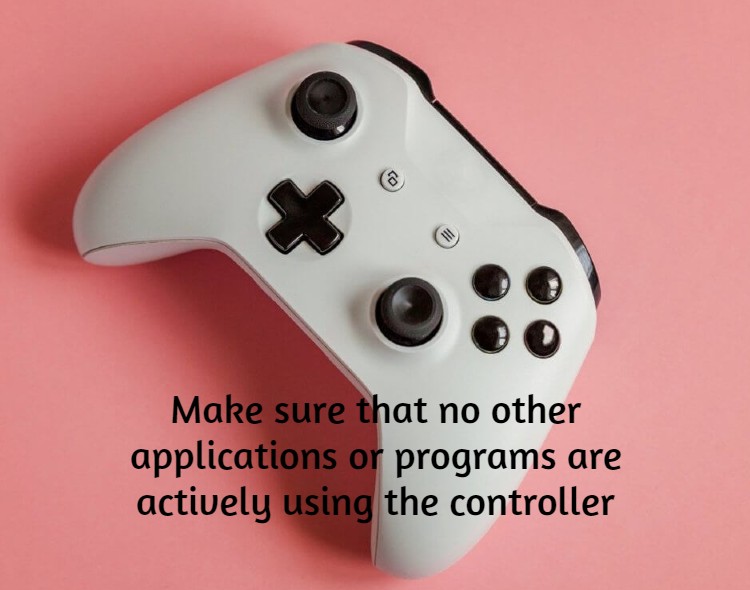
- Controller conflicts: Make sure that no other applications or programs are actively using the controller. Some applications may "lock" the controller, preventing other programs from accessing it. Close any background applications or processes that might interfere with the controller.
Keyboard Controls Not Working on Project 64
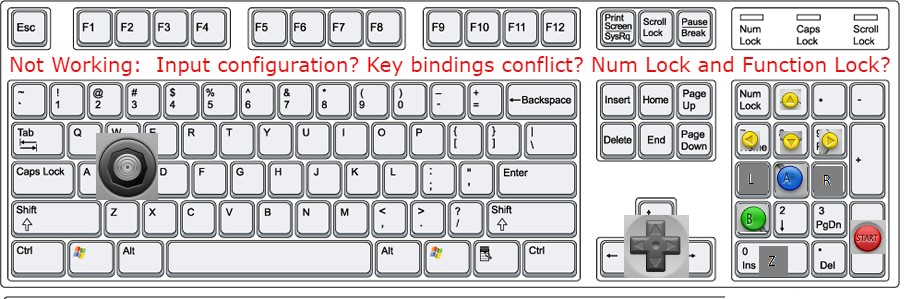
If you prefer using keyboard controls but they're not working in Project 64, follow these steps:
- Input configuration: Open Project 64 and go to the "Options" menu, then select "Configure Controller Plugin." Select the keyboard as the input device. Click on each button and key in the desired keyboard key to map them.
- Key bindings conflict: Ensure that there are no conflicts with key bindings. Sometimes, certain keys may be assigned to multiple functions, leading to conflicts. Adjust the key bindings to avoid any overlapping assignments.
- Num Lock and Function Lock: Check that the Num Lock and Function Lock keys on your keyboard are not activated. These keys can affect the functionality of certain keys, potentially causing issues with controls in Project 64.
- Last but not least if none of the steps above worked for you, you can always try another input plugin. Refer to the input plugin section for more details.
Have more and better information? Contribute by expanding the content of this page.